Forum Preservation Part 1 - Downloading all attachments in a Vbulletin thread
Intro
Over the last decade, many web forums have disappeared completely and along with them the files and conversations shared between users. It should be considered that nearly any web forum still online from the 2000s is at risk of disappearing any day. The worst part? They’re usually poorly organized with attachments spattered throughout countless threads and require a login to download, meaning while the discussions may be on Archive.org, the attachments are MIA.
Here in part 1, we will go over the most basic situation in a Vbulletin forum - downloading all the attachments in a single thread. For part 2, we’ll be looking at archiving all pages in the thread itself (as they may include valuable information), and in part 3, our grand opus - archiving every thread and attachment within a password locked forum board.
This guide is targeted towards Windows users. The only software other than Google Chrome will be spreadsheet software (Excel, Google Sheets, or LibreOffice Calc) and the latest version of Wget (as of right now, 1.20.3). It would be wise to have antivirus software installed and up-to-date, just in case. Excel is my spreadsheet software of choice because of the mass of readily available macros, VBA code, and help available online.
The situation
GSM Hosting forums have been online since 1999 and seem surprisingly well maintained for a Vbulletin forum in 2020. Happy 21st, GSM, have a beer on me.
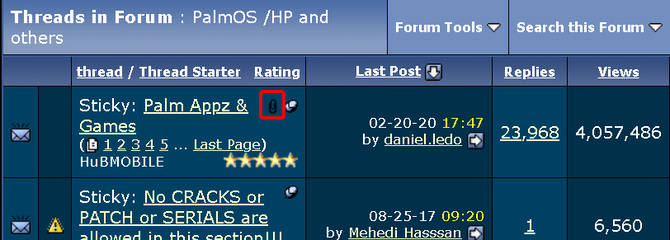
Since it has a massive scope, instead of a subforum, there is a single thread for all Palm OS downloads. It was a decently popular thread with only 23,968 replies. Yeah.
Step 0 - Prepare a working folder and Wget
Let’s create a project folder at the root of one of your hard drives for simplicity. I’m putting it in my F drive, and calling it gsm.
If you have Wget installed with GNUWin, you’re out of luck. They are distributing a 10-year-old version which doesn’t work with modern web server security. Head here and download the latest Wget for Windows.
Put the binary into the above folder, in my case F:/gsm. Let’s rename it Wget2.exe to ensure that we use this Wget version and not an out of date version elsewhere on the computer. If you know how to and would like to, you can add it to your PATH but it’s not necessary for this guide.
Step 1 - Preparing a list of download URLs
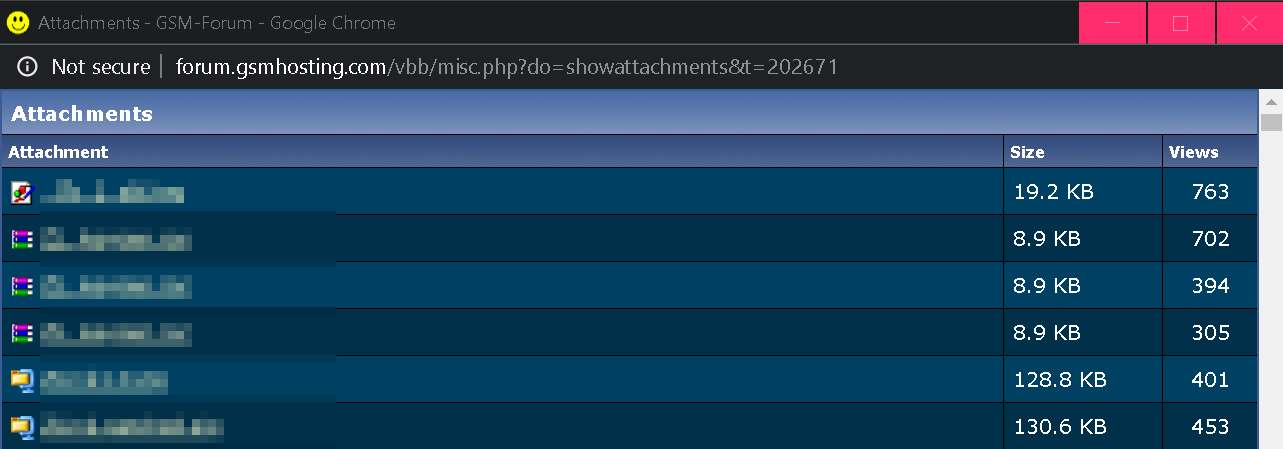
Thankfully, since it’s well maintained, the default functionality that can list all attachments in a thread works and successfully lists all 2,158 attachments without timing out. When browsing the forum, click the little paperclip next to the thread title and it opens a popup containing all attachments.

Once the attachment list loads, try a link to ensure it asks you to download a file. If it doesn’t, do not despair - part 3 will go over completely archiving a broken forum.

With that window open, select all, copy it and head over to your spreadsheet software of choice. Paste it in, making sure that you keep the hyperlinks. In Excel, it successfully detects the structure of the data.

For other spreadsheet software, Google how to extract URLs from hyperlinks and follow the instructions. For Excel, first open a new workbook then:
- Open VBA (Alt+F11)
- Go to Insert->New Module
- Paste the below code into the window.
Sub ExtractHL()
Dim HL As Hyperlink
For Each HL In ActiveSheet.Hyperlinks
HL.Range.Offset(0, 1).Value = HL.Address
Next
End Sub
- Press F5 to run the code.
Depending on how many attachments you are having it work on and how fast your computer is, it can take anywhere from 10 seconds to 10 minutes and beyond, so be patient and grab your phone or a cup of water and sip it like a fine wine while your digital slave works away. You can close VBA once it’s done.
With one column containing all URLs now, you can see how many attachments you’re trying to grab by seeing how many rows the spreadsheet has. Select the entire URL column by clicking its header and copy it. Open Notepad, paste it in and remove anything extra so that the first line is the first URL and there are no extra spaces at the bottom. Save it as urls.txt.


Step 2 - Preparing your unique Wget command
If you search how to download files from Wget that require log in, there are all sorts of complicated explanations that don’t always work. However, a gem of a suggestion from StackOverflow makes this a breeze. In Google Chrome with the forum open:
- Press Ctrl+Shift+I
- Go to the Network tab, make sure you have All selected, and refresh the page.
- If you sort by the Waterfall column, the base document appears at the top.
- Right-click the base document then go to Copy->Copy as cURL(cmd) (do not share this command with others as it can let them into your account).
- Paste it into Notepad so we can adapt it to Wget.
- Change curl to Wget2.
- After Wget2, add
-i urls.txt --wait=2 --limit-rate 500k. This gives your URL list file as input, tells Wget to wait 2 seconds in between each file, and limits download rate to 500 KB/sec. This considerably slows the process but is respectful to the server owner and prevents a potential IP ban. - Press Ctrl+H and replace
-hwith--header - Remove extra cURL commands at the end that won’t work with Wget such as
--compressedand--insecure - Add
--content-dispositiononto the end. This tells Wget to trust the filenames from the server are accurate. Without this, Wget will download attachments without their true filename or extension, making it an unusable mess.
- With the changes done in step 5, your command should look something like this.
./wget2 -i urls.txt --wait=2 --limit-rate 500k --header "Connection: keep-alive" --header "Pragma: no-cache" --header "Cache-Control: no-cache" --header "Upgrade-Insecure-Requests: 1" TONS OF HEADERS WITH USER INFORMATION vbseo_loggedin=yes" --content-disposition
I always save this text file as command.txt in my project folder just so I have it for future reference. Keep this file open.
Step 3 - The Download
Now, what you’ve all been waiting for! Open a Command Prompt (type Command Prompt into your start menu) and browse towards your project folder.
In my case, I must change the drive because my work folder is not on drive C. Simply typing F: in the command line changes the active drive. then I type cd gsm and now my directory is my work folder F:/gsm.
Copy and paste the contents of your command.txt file into the command line and let it rip! If it whines about a command Wget doesn’t understand, either remove it from command.txt or find the Wget equivalent via Google, save it, and copy it over to the command line to try again.
Once it successfully runs, it will begin downloading files. Wget and this command prompt can run with no issues in the background, so don’t worry about doing other small tasks on your computer while it’s running. Check your working folder to ensure the files look right and open one to test it out. If something looks wrong, go to the command prompt and press Ctrl+C to stop running the command.

Final thoughts
Pat yourself on your back, you’re an archivist. Put these files somewhere safe and back them up. Throw them on Archive.org.
Part 2 and 3 coming soon… ish.